Lesson 5: Establishing a Layer of Security on your VPS
2023-03-30
1015 words
5 mins read

This article describes how to add additional layers of security to your VPS.
What Layers of Security Will we Add to Our VPS?
Here are the layers of security we will be adding:
-
Disabling Root Login and Password Authentification through /etc/ssh/sshd_config
-
Setting up UFW Firewall
-
Assigning Correct Permissions
-
Setting up Fail2Ban
Disabling Root Login and Password Authentification through /etc/ssh/sshd_config
Enter the following command so we can edit the “sshd_config” file:
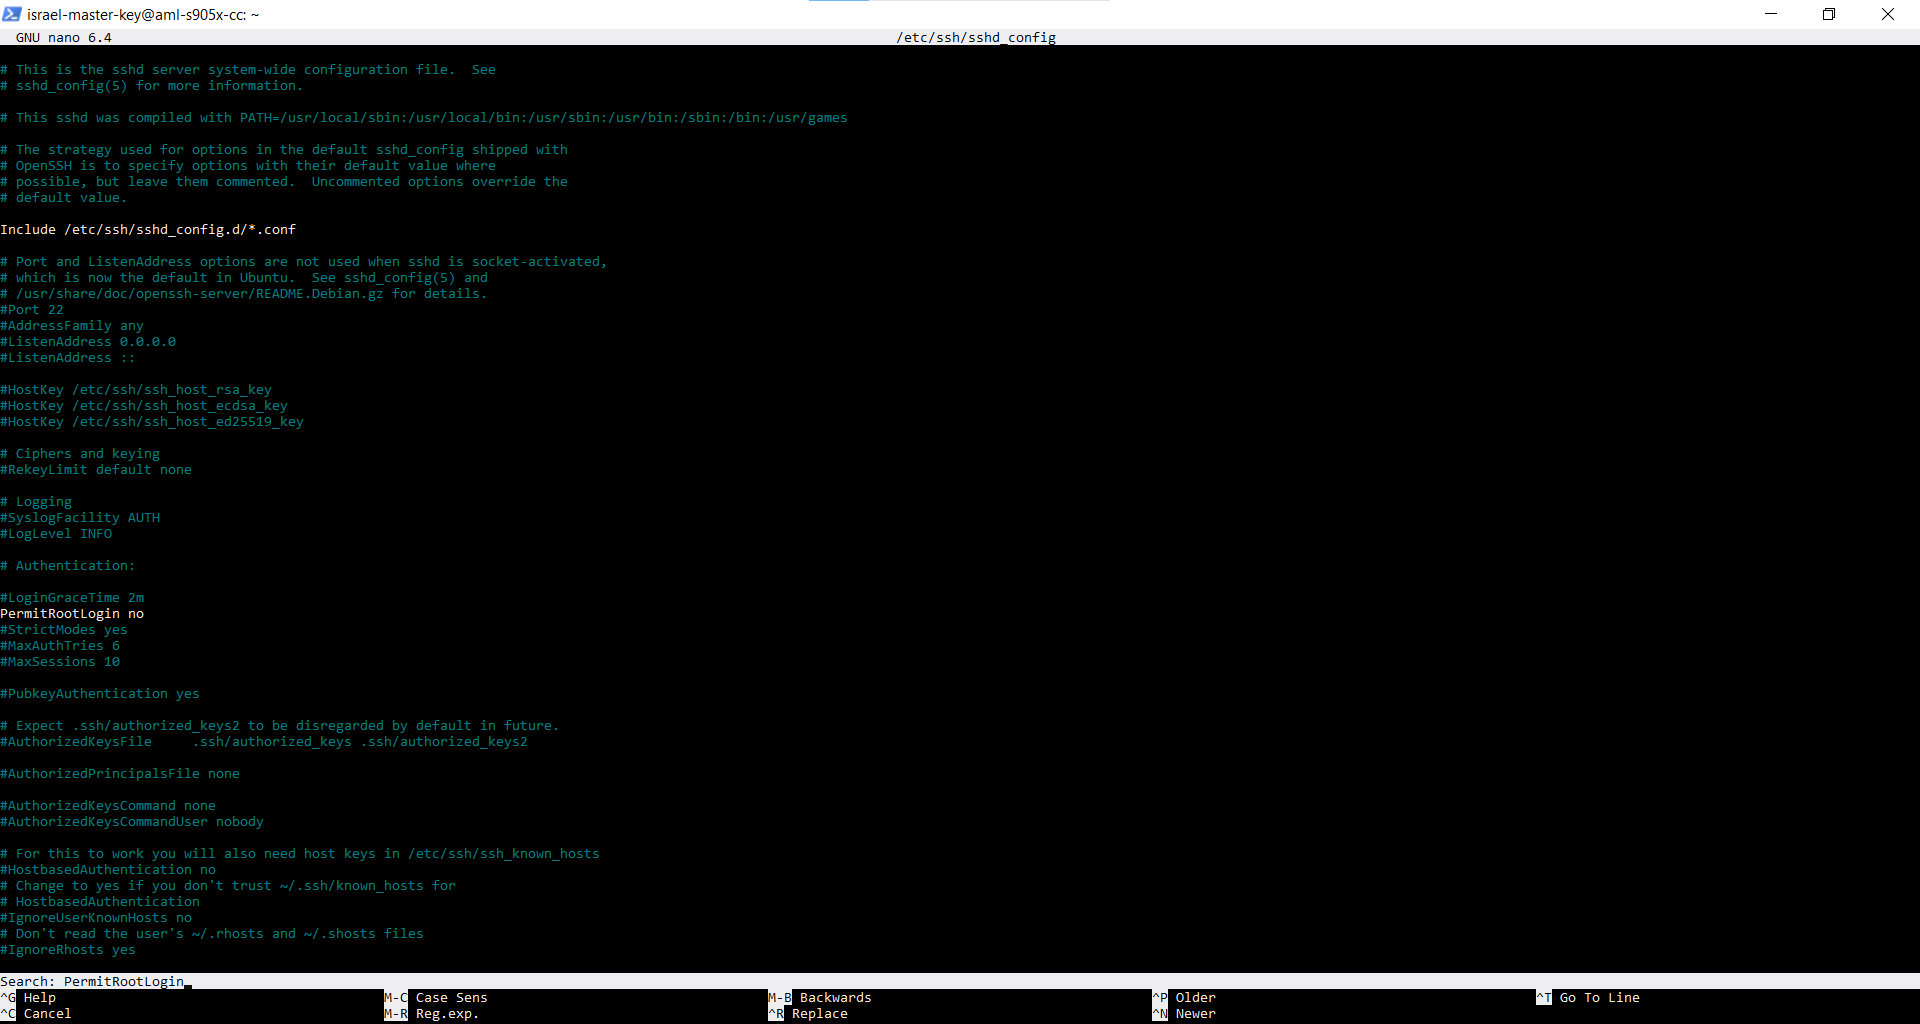
sudo nano /etc/ssh/sshd_configOnce you have the file open in the Nano editor use “Ctrl + W” to perform a keyword search and type “PermitRootLogin”:

When you hit “Enter” you will be taken to the line with this keyword. If you see the line is commented out (in other words, there is not a “#” symbol in front of “PermitRootLogin”) you will want to make sure there is NOT “#” symbol in front of this word, and a delete the “#” if it is.
You can use the “#” to “comment out” lines of code, which essentially deactivates lines of code in the bash coding language without deleting them.
Next, you will want to change this line to this:
PermitRootLogin noNext follow the same steps to search for the new keyword “PasswordAuthentication” and “ChallengeResponseAuthentification”.
You will want these lines to be un-commented as well and also set to “no”.
PasswordAuthentication no
ChallengeResponseAuthentification no
Lastly, we will change the SSH port number to a diffrent number other than the standard port 22.
In general, any unused port number above 1024 can be used for custom applications, including SSH. However, it’s recommended to choose a port number that is not commonly used by other services to avoid conflicts.
In my example I will be choosing 9175.
Find the “Port” or “#Port” in your “/etc/ssh/sshd_config” with “Ctrl + W” in your nano editor.
Uncomment out the “Port” paramater and select your number, it should look something like this.
Port 9175When you login into your server make sure to specify your port number with the “-p” flag like so:
ssh -p 9175 -i "~/.ssh/israel-master-key" [email protected]Once you have these changes save the file with “Ctrl + O” and exit with “Ctrl + X”.
Now reload your SSH service with this command:
sudo systemctl reload ssh.serviceYou have now successfully disabled Root Login and Password Authentification through SSH login, adding a first layer of security to your VPS.
Go ahead and try logging in as root to see if it works, and if a password prompt appears which both should not.
Setting up UFW Firewall
UFW may already be installed but to make sure run the following command:
sudo apt install ufwNow UFW is installed and ready to use.
Depending on the services and ports you need available you can open them and allow access through UFW.
To begin we will only be opening the port we chose earlier for the SSH port and leaving all others closed. This will be one of the most strict and secure firewall settings that enables us our bare minimum needs which is allowing only SSH access to our VPS. Run these commands:
sudo ufw allow 9175Now we enable UFW if the command ran successfully.
sudo ufw enableSelect Yes or y.
You can check the status of your firewall and all open ports with this command:
sudo ufw statusYou now have an active firewall only allowing outside communication and traffic through port 22.
The same methods of opening ports can be applied to other ports based on your needs.
Assigning Correct Permissions
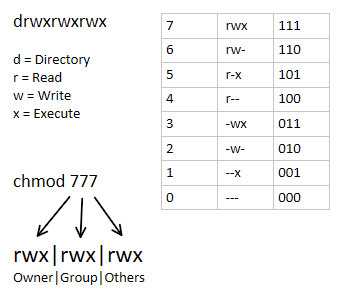
Based on what files you want to protect with certain file permissions you can follow this image guide using the
chmod
You can also use the
chownUse the “-R” flag to apply permissions recursively to all files and folders specifying a folder location.
Here are some examples.
Most Restrictive Permissions:
sudo chmod 666 your-file
sudo chmod 666 your-folder
sudo chown root:root your-folder
sudo chown root:root your-files
sudo chmod -R 666 your-folder-and-files
sudo chown -R root:root your-folder-and-files
Least Restrictive Permissions:
sudo chmod 666 your-file
sudo chmod 666 your-folder
sudo chown your-user:your-user your-folder
sudo chown your-user:your-user your-files
sudo chmod -R 666 your-folder-and-files
sudo chown -R your-user:your-user your-folder-and-files
Mix and match based on your needs, use the image guide above for more options.
Setting up Fail2Ban
Fail2Ban will stop bots, hackers, and other unauthorized accounts from attempting to SSH into your server, and is a highly recommended security feature to keep your VPS online and healthy.
Fail2Ban can be installed with the following command:
sudo apt install fail2banNow, Fail2Ban is installed and ready to use.
Your files for configuring Fail2Ban can be found here:
cd /etc/fail2ban/We then want to edit the “jail.conf” file with nano:
nano jail.confThis is where you configure how long you want these unauthorized users to be banned. You can always come back and configure for now let’s set up a default jail.
It’s best practice to not change this file directly as if you update fail2ban your changes will be lost. Best practices say we make a backup of this file and modify the changes in our backup, then copy over our backup.
First exit with nano.
You can do this simply by making a new file in the same directory with nano again.
sudo nano jail.localThis jail.local will store our specific configurations for our jail.
Add these lines to your file:
# Add lines and save

[DEFAULT]
bantime = 3h
maxretry = 3

[sshd]
enabled = true
Save the file and exit.
Now we restart fail2ban with this command:
sudo systemctl restart fail2ban.serviceYou can check the number of fail2ban jails with:
sudo fail2ban-client statusTo check the status of this jail issue the command:
sudo fail2ban-client status sshdTo unban a specific IP use this command:
sudo fail2ban-client set sshd unbanip 179.15.16.85You now have a fail2ban client enabled that will block any and all users after 3 failed ssh attempts for 3hrs.
This is an absolute must for implementing best practices for securing your VPS.
Related Articles:
- 2023/03/30 Lesson 4: Managing your VPS Users
- 2023/03/30 Lesson 3: Backing Up your VPS
- 2023/03/30 Lesson 2: Updating your VPS
- 2023/03/30 Lesson 1: SSH the Secure Shell Protocol
- 2023/03/30 What is Linux Security?
Authored By Is-Rael Landes
Is-Rael Landes, a good man living on the earth, loving making website, teaching others and coding.